

What are Swarovski Hot Fix Crystals
Swarovski hotfix crystals or hot fix rhinestones as they are sometimes called are loose crystal components with a multi faceted face one side and a flat surface coated with a heat sensitive glue on the other. The faceted face is made from lead crystal glass that has been machine cut and the polished to produce a high quality finish. Hotfix glue will take approximately 20 seconds to heat and bond with a surface, but to fully harden will take 24 hours. Once the adhesive is set it is machine washable but not recommended for dry cleaning as some of the chemicals used can denature the glue, which may cause it to discolour and become brittle or dissolve.
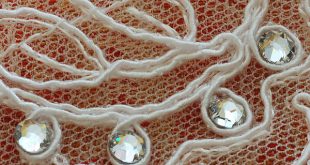
Swarovski Hotfix Crystal Structure

1. Crystal: Lead Glass Crystal
2. M-Foiling: Specially developed reflective coating to enhance the crystals brilliance and provide a strong bond with the primer.
3. Primer: The coloured primes strengthens the bond between the foil and the hot-fix glue.
4. Hotfix glue: A transparent glue especially developed by Swarovski to provide a strong bond with various materials.
What Materials Can You Apply Hotfix Crystals To
To provide a successful strong bond a material needs to be able to absorb the adhesive when it’s melted. Materials such as Paper, Card, Wool-Trevira, Cotton, Linen, Wool, Viscose, Tulle, Denim, Lycra, Cotton Jersey, Silk, Synthetics (polyester etc), Technical Fabrics and Artificial Fur are all suitable to apply hot fix crystals to. Less absorbent materials such as glass, plastic, smooth leather and fabrics with a waxy surface wouldn’t be suitable for absorbing the hotfix glue.
A simple test to find out if a material is absorbent would be the water drop test; if the water runs of the surface and isn’t absorbed into the material it will be unsuitable for use with hot fix crystals. If the material in question contains a large quantity of softening agent it may need to be washed before applying any crystals.
How to apply hotfix crystals with an applicator
Preparation
i. You will need a firm surface to work on such as a table top or work surface; ironing boards aren’t suitable as they don’t provide enough support.
ii. If adding crystals to fabric make sure that the materials surface is flat, iron if necessary.
iii. When adding crystals to sheer fabric its best to place a piece of card or a Teflon sheet between the layers to prevent the glue from seeping through and bonding any fabric layers together.
iv. You will also need a pair of fine tipped tweezers.
v. If it’s your first time using a hotfix applicator its a good idea to first test on a piece of card or scrap material.

1. Choose the correct size applicator tip for the rhinestone size you will be working with, the sizes are etched into the side of a tip. If you are unsure as to the size required place the tip over the rhinestone, the correct size tip will pick up the rhinestone.
2. The applicator tip fits on the end of the hotfix applicator, gently screw the correct size applicator tip into place.
SAFETY: Make sure the hotfix applicator is unplugged and if you are removing a tip it has already had plenty of time to cool down.

3. Turn on the hotfix applicator, Kandi Professional hotfix applicator has an on/off switch at the rear. Other applicator wands will only need plugging in as there is no on/off switch. (Kandi’s hotfix applicator will take approximately 2-3 minutes to reach working temperature) Lay the applicator on the work surface with the tip pointing away from your working area so that you do not burn your hand as it heats.

4. Place your hotfix crystals onto a clean flat, solid surface. (placing them onto a piece of white card can be helpful if you are working on a dark surface)

5. Turn all the crystals so that they are facing faceted side up.
Applying the crystals

6. Once the tip has heated your ready to start creating the design, gently place the tip over a rhinestone to pick it up, but don’t press hard or the crystal may stick to the surface.

7. Once selected the hotfix crystal will sit perfectly within the tip.

8. Watch the crystal it will start to look wet and shiny and may bubble when the glue melts, this is important to ensure that the adhesive is given the correct timing. Small crystals will take less time for the glue to melt than larger ones, an ss12 will only take around 8 seconds where as an ss16, 4mm crystal will take approximately 10 – 12 seconds. Allowing the adhesive to melt before placing the crystal onto the fabric will also help to prevent burning from prolonged heat of the tip coming into contact with the fabric.

9. Once the glue melts the crystal is ready to apply to the fabric. Lightly press the crystal onto the fabric holding the wand at 90° to the surface to ensure that the crystal bonds correctly. It’s a good idea to support the fabric so that it doesn’t lift when you pull the hotfix applicator away, if the crystal gets stuck in the tip use the tip of a pair of tweezers and push downwards through the slit in the tip to free the crystal.

10. When the crystal comes out of the tip the adhesive is very hot, so give the crystal a few seconds to cool then gently pull on the crystal to see if the glue has bonded to the surface correctly. If the crystal is still loose place the tip over the crystal for a few seconds to melt the glue and then test again once the adhesive has cooled to ensure that the crystal is firmly bonded to the fabric..

11. Complete the process of adding crystals and testing until your design is complete. It will take 24 hours before the adhesive is fully set the crystallized fabric should not be washed within this time.
Author: Crystal and Glass Beads


Man, I reckon I would have to practice that on some scrap rags or something before attempting it for real. I have to admit I was holding my breath there for awhile as I read your post 😉
If the crystals fall off whilst garment is used can they be fixed on again? How can I make sure they are really on hard??
Hi Georgina
Yes crystals will come loose and fall off over time especially if the garment is machine washed or tumble dried, but they are easily replaced, with the Hotfix its important to make sure that the glue melts before placing the crystal on the fabric, you can ensure this happens by watching the backing which will change appearance slightly as it starts to melt then press onto the material.
can i hotfix on to silver?
Hi Evie
No hotfix is for fabrics, paper and card and wouldnt be suitable, for silver you would use a suitable adhesive or jewellery cement.
I am wondering if the glue on the back will turn white bridal fabric yellow around he area its been applied. I am thinking about using this wand as my main tool for embellishing bridal, pageant and ball room dresses. Will the glue backing wear off eventually and crystals fall off?
Hi Dana
The adhesive on hotfix shouldn’t turn fabric yellow as its specifically designed to be used for fabric. If done correctly the crystals should be quite hard wearing, the problem comes when the dress is dry cleaned (these dresses are usually dry cean only) the chemicals used will denature the glue, which is why most crystal garments carry the warning hand wash only.
I have a hot fix wand but when its heated up it wont pick up the crystals. do you know why this might be?
Hi Sammy
This can be for a number of reasons. The tip may be more suited to a particular brand of crystals, each crystal brand has a different cut along with the number of facets and table height (some are less compatible). It could be that the tip needs cleaning if glue has melted in the tip cup or the size tip being used may not correspond with the crystals size. It’s a pain but to use the crystals and tip combination you have try using a tweezers tip to pick up the crystal in the hotfix tip.
Can you use these for nails? If not which type can I use?
Hi Hayley
Generally ss5 are the most popular size for nails and ss7 for toe nails.
Do you ever use hotfix for decorating shoes?
Hi Heather it would very much depend on what the shoes are made from if its for the side of converse i.e. the canvas part then hotfix will work well along with using on other fabric shoes, but it wont work on plastic, leather or rubber as the hotfix adhesive isn’t designed to bond to these.
Hi
I recently purchased the hot fix applocator wand and I find that the gems I have are pretty much melting.
Is there a specific type of gem that should be used? Maybe a silly question but must it be made from glass?
Hi Naz
If you are using acrylic crystals the glue melting point is around 120°C and the acrylic melting point is 160°C, so its likely that you are applying heat for too long. With crystal or glass flatbacks you don’t get this problem, so in answer to your question either apply less heat or if this doesn’t work opt for a more expensive hotfix make.
Can I use got fix on lace ?
Hi Natalie
You can use hotfix or gemtac glue for applying crystals to lace, washing the lace first will remove any chemicals from the fabric prior to adding crystals.
Hiya, I am hoping to start blinging up some of my mobility aids such as my crutches. What should I use instead of hotfix as I know that is for absorbent materials. I would really appreciate any advice you could give 🙂
Hi Sophie
You will need non hotfix foil backed crystals which you can find here and a suitable adhesive. E6000 (has nasty fumes so will need to use in a well ventilated area or use a protective mask) would probably be the strongest and then gemtac glue both of which are flexible once dry which helps if the crystals may take some impact. If you are crystallizing plastic giving it a gentle rub down to lightly scuff the surface will provide a stronger bond between the adhesive and plastic surface. The other option if you don’t find these adhesives strong enough is to use a slow drying araldite which is a 2 part epoxy resin which dries solid once cured (slight flexibility if bent) and is very hard wearing. For picking up the crystals there are a number of tools you can use the cheapest being the jewel setter which is great for ss12 and above for a smaller crystal size either the magic pick mini or the crystal katana would be more suitable. The jewel setter does leave some wax residue on the crystals but this buffs off easily once the glue is set. We have a pdf which you can print out to show all the crystal sizes if you are unsure which you can find here along with a guide to using non hotfix flatback crystals here.
If you are still unsure of anything just give us a call on 01792 524 956 and I will be happy to help.
Khaled
Is it possible to use hotfix rhinestones on polyester crepe fabrics? I want to add some decoration to an abaya. Please let me know if you or anyone you know has done this before. 🙂 Shukran
Hi Amanda
Hotfix crystals are fine for polyester but in not sure if the crepe fabric will be any different. A good test to tell if a fabric is suitable for hotfix is to put a few drop of water on the fabric surface, if the water absorbs into the fabric its suitable for hotfix, if the water rolls off or takes a long time to seep into the material then it will have insufficient absorbency for the hotfix adhesive to give a good bond. It would then be better to use non hotfix with s suitable adhesive (gemtac or e6000).
Hope that helps.
hello- we are trying to hotfix crystals to a very sheer soft tulle…….. i am trying so hard to find out if i have to STRETCH the georgette tulle fabric of our dance top whilst we are gluing the stones on? ie we have it over the end of an ironing board to match a similar size to my daughter…
AND are we better to use glue or the hotfix tool gun? ( we thought this may melt the fabric?) - HELP please!!!
Hi Maree
I would lay out flat but not stretch too much or the design will crease when it contracts and become distorted. Hotfix crystals shouldn’t damage the fabric as they are designed to be used on materials such as Paper, Card, Wool-Trevira, Cotton, Linen, Wool, Viscose, Tulle, Denim, Lycra, Cotton Jersey, Silk, Synthetics (polyester etc). If you are going to use hotfix watch the glue soften on the crystal whilst it’s in the tools tip and then press onto the fabric, this shortens the contact time between the tip and fabric if you are worried about burning. If you aren’t comfortable using hotfix crystals you can opt for non hotfix and e6000 (make sure you press the crystals into the glue to get a good strong bond).
can hotfix be used on Swimwear material?
such as elastane, polyester, spandex, lycra
Yes can be used for Swimwear.
I have applied my hotfix on tulle but the stones are falling off. I haven’t washed the item. Can you give advice?
Hi Jackie
There are a few reasons why the crystals can come loose the first being that the fabric isn’t porous, you can test to see if it is by putting a tiny drop of water into the fabric, if it sits on the surface then the material isn’t porous if it absorbs into the material then it’s fine. If the dot of water just sits on the surface then any crystals that come loose should be re applied with a glue like gemtac to make sure they don’t come loose again. If the dot of water does absorb into the fabric then its one of two things either too much heat has been used when applying the crystals and the glue has dried up or not enough heat has been applied to suitable soften the heat sensitive glue on the backs of the crystals.
Hi
I’ve created some transfers with hotfix crystals what is the best way of fixing these to clothing?
Hi Hannah
Using a heat press or iron with the steam turned off would be the quickest way.
Hello
When applying rhinestones to a leotard would I stretch fabric e.g put on a dressmakers dummy as if being worn or lay it flat on a surface with card in between layers l
The pattern has done straight lines so worried they will be wonky if not done correctly
Thank you
There is a pretty good tutorial here that should help. Rhinestone Application
What is the best way to attach rhinestone to dog collars. Needs to be durable so they don’t fall off and get eaten! Thanks
Hi Laura
Generally professionally produced dog collars will use either Swarovski rivets or rose pins so that there is no requirement for glue. For the rose pins you require the pins, a hand press/tool and a specific tip for the pin size. To use rivets which come in 2 parts, you need a punch to create holes through the leather, a hand rivet gun, a specific tip for the Swarovski rivet shape/size and of course the rivets themselves. Either method requires costly equipment initially which is fine for a business producing volumes of dog collars but not for a one off project. All of the adhesives I have tested on leather won’t last long term unfortunately.
How do I clean the different sized tips for the hotfix wand? They are coated with glue.
You would use a wife brush to remove any burnt glue which has seeped over the tips.
I am also having the issue that the hot-fix tool will not pick up the crystals, Even when I place them in it with tweezers, if I turn it to put it on garment, it falls out?
Hi Helen
It will just be a case of the prongs are a little far apart. Heat up the tip so that it’s expanded then try picking up the crystal. If the gap for the crystal is too big then gently with pliers gently press the ends together (very gently or you will close up the tip too much and make sure you don’t touch the end with your fingers or you will burn them) try picking up the crystal now and if you have closed sufficiently which should be a tinny amount the tip will now pick up the crystal and hold it. If you press too much with the pliers you will close the tip too much or snap the prongs so verrrrry gentle. Before doing any of this make sure that the crystals and tool are compatible.
Khaled
Can hotfix be used on mdf?
Hi Vicky No hotfix cant be used on MDF you will need non hotfix and a suitable adhesive, hotfix are generally used for fabrics, paper and card.
Is there anything u can use to makesure your stones will stay on? I somethimes us the hotfix aplicator and sometimes I use glue E8000
Hi If it’s a rigid surface you are crystallizing there is a product you can use on top of the crystals (can’t remember the name though sorry) but it does decrease the crystals sparkle, the same as if you apply a top coat over nail crystals it diminishes the effect.
sorry to be a pain, but could you glue hotfix rhinestones with e6000 to stop the foil from coming off? as you would be essentially gluing the glue ?
Yes you can use e6000 with Swarovski hotfix crystals, I wouldn’t recommend as your bonding glue to glue and the cost of hotfix is greater than non-hotfix. However I have used a number of times and never had any problems. If on the other hand you are using acrylic crystals the e6000 will eat the crystal backing and cloud the crystals.
Can Hotfix be used on stretch velvet?
Yes but you need to stretch the fabric first before applying the crystals or they will likely come loose and fall off.
Hi, I am making a ring at college are these the best crystals for using as stones in it please? They will be set in sterling silver?
Foil backed chatons will be your best bet for setting into silver jewellery, see How to use chatons
Hi, I am using the hotfix pyramid crystals but they seem to look like they are lifting at the corners or not adhering properly. Do you have any advice on how I used be heating these on e.g. how long and what pressure?
Hi Shireen it would very much depend on the size and brand of crystal you are using as to how long to apply the heat for, but it sounds like you aren’t applying heat for long enough to melt the hotfix adhesive. If you are using the flat hotplate tip with the applicator tool to heat the glue you can try….. holding the crystal sides with tweezers, hotfix glue facing up. Apply the flatplate to the back/tip/side of the pyramid and count how many seconds it takes for the hotfix glue to visibly melt and turn to liquid.
Can you use the hotfix tool to apply rhinestones without adhesive on the back? If so, what kind of adhesive would you reccomend?
Hi Jazmine, hotfix crystals are pretty much the same as non hotfix crystals just a little shallower in profile to fit in the applicator tool, however on the back of the crystal is a heat sensitive glue. This is usually grey, white or a copper colour and looks like a rubber shiny backing. When the applicator tool heat is applied to the crystals this backing melts and bonds to the crystal to the surface, but without the heat sensitive backing you would just be heating up the crystals to no effect. Hope that makes sense.
I recently applied some swarovski hot fix crystals on a standard cotton t-shirt. Can you provide any washing instructions (dos and don’ts) that will clean the shirt without causing the stones to fall off? Is it also safe to iron a shirt that has crystals on it ( I am assuming this can be done by turning it inside out ?
Hi Sean If you turn the shirt inside out and wash on a gentle wash with a detergent that doesn’t have any bleach in, while crystals are designed to be machine washed a cooler wash is a much safer option. Yes you can iron the t-shirt after just dont leave the iron on the crystals part for a prolonged period of time or it will again heat up the adhesive and they can come free. You may find this useful. Machine wash test
Basically things that will make the stones fall off is if they are heated to the point where the adhesive bond starts to melt, then if they bang or rub against anything they may come free. If the crystals bang into anything or brush against something roughly the primer and hotfix can occasionally separate leaving behind the hotfix backing on the t-shirt.
If you are at all worried wash the item by hand in cool water inside out, you can put it again turned inside out on a delicate wash with gentle fabric and place it inside a pillow case to prevent the crystals from banging or rubbing against the drum. If you do end up loosing some crystals over time either because the bond wasn’t good to start with (not enough heat applied) or just from wear and tear, it’s really simple and quick to replace them so I wouldn’t worry.
does anyone know how to apply alot (120) of stones on leather not with a wand as it takes around an hour and an iron shinks the leather
Hi From any of the tests I have done hotfix doesn’t bond that well with leather, but if you have had good if you wish to apply that may crystals in one go, you can use a heat press or an iron with the stream turned off.
Hello,
I plan on attaching hotfix rhinestones to a cotton/polyester hoodie using an iron. What would be the best heat setting to use on the rhinestones, and how long should I keep the iron on the stones? Should I also cover the stones with another material while ironing them?
Thank you
Hi Vanessa a medium heat setting with the steam turned off is recommended, I would place a wooden board under the fabric or place the item on a hard surface. You can place a sheet of fabric over the crystals ive tried this in the past but often it will nudge the crystals slightly even if you are careful. I have used a sheet of thin card or thick paper between the crystals and iron and just place it down with the iron to act as a barrier and found that it worked quite well. As regards to how long it takes to bond that would depend on the crystal size, make and heat setting used. To find out test one crystal first, heat up the iron and then press the iron of the crystal for a few seconds then leave the crystal to cool. Once the glue has cooled down try gently picking at the crystal to see if the glue has evenly bonded the surface to the fabric (remember the purpose here is just to see if there are gaps where the glue hasn’t melted or if there is a good bond not to see if you can tear the crystal from the fabric ; ).. If the bond isn’t secure apply for a second or two more.
If the design you are creating is intricate you can use something called Hotfix Transfer paper. Print out your design, pull apart the transfer paper and place sticky side up over the design (much like tracing paper) then place the crystals one at a time to create the design, placing the crystals onto the sticky heat transfer paper faceted side down (so the hotfix backing is facing up). One you have created the design you simply turn the sheet over so that the crystals are on the bottom and paper between the crystals an iron and apply heat to secure them into place. If the iron is a little hot you can use a tea towel between the iron and transfer paper to prevent it melting and not worry about moving any of the crystals this way.
Hello,
What are the “hot spot” tips used for? There are 2 sizes that come with the wand. They have a flat surface so you can not pick up the crystals. I am not sure how to use them.
Thanks!
Hi The flat plate tips can be use for any size or shape hotfix crystal. The ss10, ss16 eor other sizes will be for a specific size and the crystal sits within the tip but if you have a hotfix shape or non standard sized crystal that you don’t have a tip for the flat plate tips can be used to apply heat and bond them to your chosen surface.
Where can I purchase the hotfix Swarovski crystals and the tool? I will be embellishing hand-painted silk and velvet scarves. In the US.
Hi We supply both hotfix and non hotfix crystals but are based in the UK so finding a US supplier would be a more efficient option for a business.
I’m wanting to apply crystals to wallpaper that’s already hung. Any recommendations for the tools and stones?
Hotfix crystals would be the easiest choice, the tool picks up the hotfix crystal then you simply press it onto the wallpaper and the heat transferred through the tip melts the heat sensitive glue on the hotfix crystals. The alternative is to use non hotfix and something like gemtac glue which is for paper. Apply a tiny dot of glue and leave for a minute or two for the glue to thicken and become tacky, gemtac is quite runny so if you apply the crystal immediately it may slide a little. E6000+ is another alternative and thicker than gemtac but has a lot more toxic chemicals so wearing a mask is recommended when using.
I am wanting to apply Crystal’s to a competition ice skating dress, I want them to really sparkle which should I choose for this effect please.
Hi Lisa it would completely depend the look you want to achieve, is it to compliment the colour theme? In which case it would depend on the colour or are you just trying to create the multi colour sparkle you get on many ice skating or dance costumes in which case clear crystal or crystal AB would be the most popular choice. You can also use a combination of the two colours which will give a really nice effect but it would depend on the effect you are trying to achieve, for multi colour sparkles (pink, purple, silver, yellow) Crystal AB, if you want to tone down the colours clear crystal.