Guide to Crystallizing Text Using Swarovski Flatback Crystals
This tutorial was created by Crystal and Glass Beads
Swarovski rounds stones also known as chatons, table diamonds or pointed back stones are available in a range of styles, sizes and colours.
Although they can be used in a number of ways the 3 most popular methods of application are:

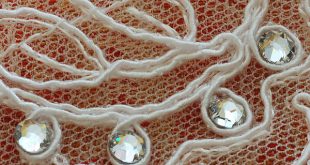
A – Enclosure in a setting – This method uses a setting such as a ring, clasp, pendant, chain etc to hold 1 or more chatons into place using fine jaws/prongs. The chaton is placed into the enclosure and the prongs/jaws of which there are usually 3 or 4 bent over to secure the crystal in place. See example above.

B – Clay setting – This method uses materials such as metal clay or ceramics to embed the crystals into the soft surface which is then hardened securing the crystals into place. Metal clay or ceramics are used for jewellery an example of which are Swarovski’s Pave beads which can be seen above.
C – Creating a cavity – This entail’s physically creating a cavity (hole) of the correct size for the chaton to be placed into and securing with an adhesive. This method is widely used in the manufacturing process where high tech CNC machines precision drill or mill cavities for the crystals. This method can also be used for making handmade items using a power drill or hand drill depending on the material the cavity is being created in. See example above where chatons have been glued into cavities drilled into the sunglasses frame.
Foiling

Foiling is the mirror coating found on the back of most rhinestones and round stones (chatons), the coating increased the level of brilliance and means that the crystals can be set into or glued onto any surface without loosing any of their brilliance.
 |
Platinum Foiling (F) – Silver reflector coated with a platinum-colour protective layer. |
 |
Aluminium Foiling (M) – Aluminium reflector. |
 |
Unfoiled (U) – No coating. |

Chatons come as foiled or unfoiled. The unfoiled kind are like miniature diamonds, rubies, sapphires etc depending on the crystal colour they are cut from. They are perfect for decorating wedding tables or scattering around a centre piece as they look perfect which ever way they land. Foil backed crystals on the other hand have either a gold or silver coating which completely covers the pointed facets of the stone making them less suitable for scattering. Although the foil backing doesn’t look as appealing, when the crystals are set into a cavity this backing is completely hidden. Just like a flatback crystal the purpose of the foil backing is to act like a mirror so that no matter what material the crystal is set into the chaton face protruding from the surface will look dazzling. If you try and set an unfoiled crystal into a cavity and then compare it with a foil backed crystal, you will see that the unfoiled crystal completely looses it’s appeal and looks dull (depending on the material its set into).
For this tutorial we are going to look at the theory for creating the correct cavity and then carry out a test to see how simple or difficult the technique actually is.
When gluing SWAROVSKI ELEMENTS to achieve a strong long lasting bond a number of steps need to be followed in the right order..
1.. Cavity Production

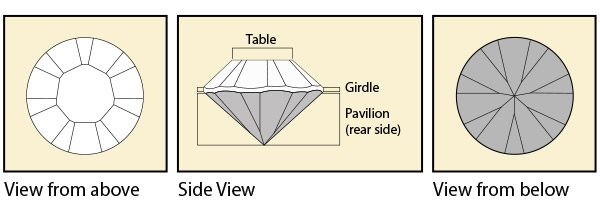
To produce the optimal cavity for Xilion Chatons a twist drill with an angle of 90° – 93° should be used. The cavity produced should be the same size as the chaton plus at least a 0.1mm to allow for the adhesive. If its a large cavity that’s being created and the chaton has a prominent girdle it’s recommended to also countersink the cavity.

When creating a cavities the size should be based on the crystal size being inset, the maximum tolerance for the cavity and the production tolerance. Generally if the piece is being made for you the higher the tolerance the greater the cost. When creating the cavities manually if you find the cavity’s are too big the tolerance can be improved by clamping the material so that its firmly held and using a box column drill. Using a good quality drill bit of the correct size and type is also very important to achieve a good finish. If you are unsure of the round stone dimensions the information can be requested for you from Swarovski. You can download a chart showing the crystal sizes here
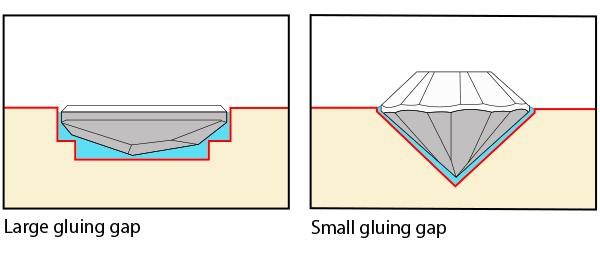
Incorrect cavities


2.. Preparing the surface for gluing
Once the cavities have been drilled they need to be cleaned to ensure that there is no grease, dirt, silicon etc. If you use a solvent based cleaner such as Isopropyl Alcohol (rubbing alcohol) wait a few minutes to allow the any liquid to evaporate.
3.. Choosing the right glue

Before choosing an adhesive you need to consider the size of the gluing gap that has been created from the cavity drilled. If it’s a large gluing gap then soft flexible adhesives like silicon is recommended. Alternatively if the gap is small epoxyethene/polyurathane glues are preferred because of the increased strength of the adhesives. For gluing smaller sized crystals it’s recommended to use a glue with a higher shearing strength such as epoxy resin (See chart below for recommended adhesives).

There are some things you need to consider before selecting an adhesive for your project such as pot life (how long the adhesive lasts once mixed), viscosity, colour, curing time, curing temperature, ease of use and shrinkage.
While many adhesives tend to shrink while curing this shrinkage can be greatly increased by using the wrong type of adhesive for the cavity size or incorrectly curing the adhesive under the wrong conditions or temperature. If excessive shrinkage does occur the tension between the adhesive and coating could become great enough to tear the foil away from the crystal.
Choosing the correct adhesive to bond with the base material
Below you will find a guide to finding the right adhesive for your project, the table features common adhesives which should all be available globally and identifies which base materials they are compatible with.

4.. Using the correct dosage
If the system applying the glue is automated then a dispenser with a vacuum connector is perfect because it prevents any adhesive from dripping. For manual application a syringe with a fine precision tip is ideal for ensuring that you apply the correct amount of adhesive.
Glue application

For a round gluing area apply a small dot of adhesive into the bottom/centre of the cavity slowly lifting the syringe as the glue is released so that no glue goes over the cavity sides. This will then ensure that the adhesive spreads evenly once the crystal is inserted into the cavity.

If the gluing area is square or rectangular apply the adhesive in a cross as seen above to ensure an even distribution of adhesive.
Glue quantity
You need to ensure that you apply enough adhesive so that when the crystal is placed into the cavity the adhesive spreads out to the edges to ensure the foil backing is protected.


5.. Testing the technique

1. Mark up the pattern where the cavities are going to be created.

2. Ensure that the item is firmly secured (using a soft jaw vice is handy) then drill pilot holes with a small drill bit ready for drilling the full size holes, these will act as a guide for the larger drill bits used later.

3. Drill out the correct size cavity to do this I used a hand drill (on my first few attempt I used a power drill and because the material is soft plastic I found it too fierce). If you are using a box column drill instead of a hand held power drill it will allow you a lot more precision. For drilling plastic you really don’t need to apply any pressure the weight of the drill was enough. Every 2 or 3 drill rotation I perform half an anti-clockwise rotation to break up the swarf (plastic swirl).

4. The first cavity complete. I tested the cavity size by placing the chaton into the cavity I repeated this process 3/4 times removing the chaton and then continuing drilling before I reached this stage with the correct depth. (Prior to this tutorial I also tested drilling a number of cavities to see how much pressure to apply and the number of rotations required per cavity).

5. That’s all the cavities completed.

6. Clean out the cavities using a cotton bud dipped into Isopropyl alcohol (rubbing alcohol) then allow a minute or 2 for all the liquid to evaporate.

7. Apply a small amount of adhesive using a precision tip syringe.

8. Pick up the crystal and place it into the cavity, I used an orange stick (wooden stick for nail cuticles) to push each crystals firmly down into the adhesive.

9. That’s the first crystal firmly in place (I tested to find out the amount of adhesive required on the test cavities before starting the tutorial. This image was also a second attempt on the first one the adhesive squirted out around the sides, so I had to remove the chaton and clean up all the adhesive and then re apply the adhesive).

10. That’s all the crystals firmly in place. You can see slight gaps around the crystals which aren’t perfect and these could be improved upon by. 1.. Using a better quality drill bit. 2.. Using a fixed drill so that there is no movement except vertically. 3.. Using a thicker adhesive (One stated in the table) for the sake of the test I tested the three adhesive I had on hand, the best one being e6000 (gemtac shrunk too much and GS Hypocement was really easy to use but was brittle once dry).
I hope you found this tutorial useful, if you have any questions please make a comment. You can view our full range of Swarovski Elements here

 Crystal and Glass Beads Blog Crystal and Glass Beads blog


Can these be set into glass?
Hi Emily
Yes they can be set into anything a cavity can be drilled into but you will need a special drill bit for glass.
Hi! Very helpful article….can I do this with metal? I want to use silver pendants. Also where can I find a chart that tells me what size drill bit to use with different size rhinestones?
Thank you!
Jennie
Hi Jennie
You can download a printable pdf size chart here https://www.crystalandglassbeads.com/swarovski_crystals_colour_chart.php which will tell you the tolerance range for each crystal and hence drill bit size.
hello
great article , thanks
can you give me the right drill bit to use ? for example SS16 painted back ?
thanks
Hi daoud
I would contact Swarovski Create Your Style for detailed information as to which drill bit to use.
You can buy a set of stone setting burs that will fit into any rotary tool that will take a 3/32nd inch shaft from a jewelry supply company. I got mine from Rio Grande jewelry supply. They are not expensive and cut a perfectly shaped cavity.
Hi what glue would you use to apply flat back Swarovski on top of a transfer on a top (kids dance logo transfer) font want to use the hot fix incase it melts the transfer
Hi Helen I would opt for Gemtac, E6000 would provide a slightly stronger bond but it’s possible the chemicals in the glue may melt or discolour the transfer plastic depending on what it’s made from. Ive used gemtac on an Elvis transfer and hen weekend t-shirts before to bling them up and had no issues.