

What you will need:
a. Swarovski flatback rhinestones NON-HOTFIX: size ss5(1.8mm), ss7(2.2mm), ss9(2.6mm), ss12 (3.2mm) and ss16 (4mm) for this tutorial the main crystals for the stripes and outer edge are ss12. View Swarovski Non-Hotfix Flatbacks also called rhinestones.
b. Jewel setter: This is a plastic wand with a wax bud one side and pointed end the other, it makes picking up rhinestones very simple. View Jewel setter
c. Sand Paper / Emery board: You will either require a small piece of fine sandpaper or an emery board.
d. e6000 adhesive: This is an industrial strength craft adhesive that’s very strong, flexible, waterproof and clear in colour. It should be used in a well ventilated area with a mask for protection from the harmful fumes. View e6000 glue
e. Piece of cotton cloth / hanky: Cotton is ideal because it doesn’t leave fibres behind when you wipe a surface.
f. Orange stick: Small wooden stick used for pushing back cuticles.
g. Isopropyl alcohol (rubbing alcohol): Used for degreasing a surface by removing any traces of oil and grease and dries very quickly.
h. Converse Hi-Tops: To add the crystals to.
i. Pen or Pencil: To draw the template for the star and stripes.

Preparation
1. Give the rubber toe surface a good rub with the sand paper / emery board to roughen it up. Once the surface has been prepared it will provide a much better platform for the adhesive to bond with.
2. i. Wipe the rubbery powder from the toe.
ii. With a Clean dust free part of the cotton cloth clean the surface of the toe with some alcohol to remove any grease, oil or dust. Because the fluid is alcohol it will dry very quickly and leave no residue.
Creating The Star Toe

1. To create the star you can use a stencil if you have one or as I did for this tutorial printed out a star on card, then cut it out and used as a template for drawing the star.
You can use a sharp pencil to draw the star or a pen, for this tutorial I used a permanent marker which turns out not to be permanent on Converse rubber and will smudge if you get it wet. To prevent the pen from running you will need to completely cover the surface of the toe with adhesive when adding the crystals to seal a protective waterproof layer over the ink.
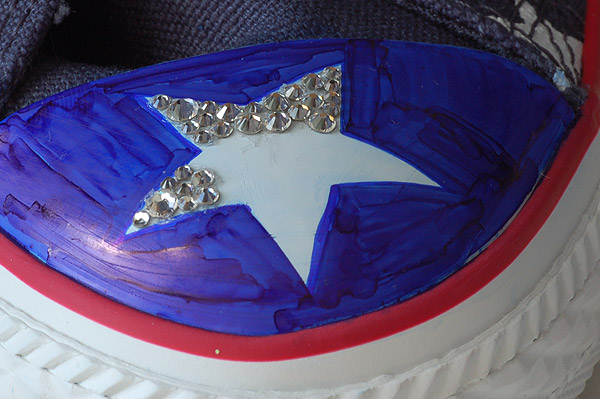
In the first image you can see a nice clean star which I left to dry and then stupidly thought, I will just test to see if the pen is actually permanent so wet my finger and proceeded to rub the blue which made a real mess. I has to clean it all off and start again and as you can see in the next image the star is no longer crisp and the white has pale blue smudges : (
A nice tip I had from a customer is to draw the shape in pencil, then space out the crystals and fill in any gaps with a very fine colour glitter.
2. Using Clear Non-Hotfix flatbacks starting adding crystals at one of the star points and work inwards.

3. Continue working your way around the star points adding crystals to fill the gap using various sized crystals.

4. Once the points are crystallized keep working your way to the centre closing the gap until the star is completely covered with crystals.

5. Starting at the top corner add some e6000 then start to add crystals along the top edge of the toe (only add enough adhesive for a few crystals at a time as e6000 dries fairly quickly). The blue crystals used in the tutorial are Swarovski Cobalt which is an electric blue and the main size used along the outer edge is ss12 (3.2mm) with ss5, ss7, ss9 and ss16 to fill in any gaps.

6. Fill in the gap between the top row of crystals and the star you will need a variety of crystal sizes unless you decide to fill in the gaps with glitter.

7. Add crystals along the outline of the star with Cobalt crystals to get a nice clean edge and then proceed to fill in all the gaps.

8. One complete Star toe.
Creating The Stripe Toe

9. Draw the red stripes. If you only have one or two crystal sizes to work out the width of the stripe set out a row of crystals on a flat surface then add a second, third and fourth row of crystals. You will only need 5 or 6 crystals in each row then offset each row so that the crystals sit between the crystals in the previous row. Once you have the 4 rows complete measure their width and use as a guide for drawing the first red stripe. You can then do the same for measuring the clear crystal stripe so that there are no large gaps. To Draw the lines I used a soft plastic tape measure.

10. Add the first row of red crystals along the edge of the stripe the crystals used are Light Siam which is a vibrant pillar box red.
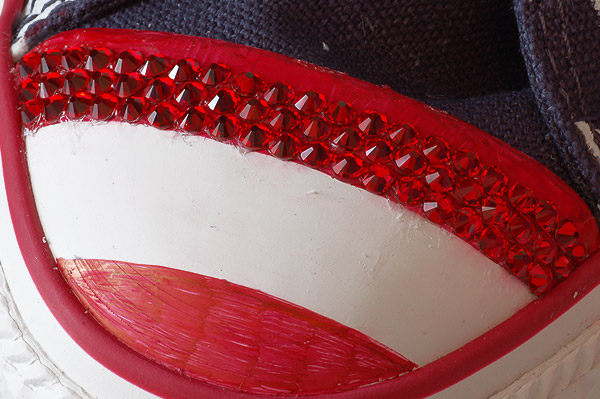
11. As you can see in the image each row of crystals are offset to cover as much of the toe surface as possible. Either the first row or offset rows will require a smaller crystal at each of the outer edges to fill in any gaps.

12. Once the red stripe is complete start adding clear crystals for the white stripe one row at a time until the white stripe is complete and then fill in the red gap at the end of the toe. The tip of the toe will require a range of crystal sizes to tightly fill in the gap.

13. Once completed stripe toe.

14. The finished Pair of Swarovski Hi-Top All Star Converse. Leave for 24 hours to dry then give a spray with canvas shoe waterproofing spray.
View our Swarovski Converse Tutorial for Creating a plain crystal toe


This is so fab, I’ve been waiting for you to put this on your website. Do you think you can use sharpie markers? Or I’ve seen people painting heels with acrylic paint before crystallising, do you think that would work on the toes?
Hi Danielle
We also have Sharpie permanent markers (ones that come in the pack of 4) unlike the Staedtler they aren’t ‘dry safe’ which means you have to be very careful when applying them not to smudge the ink which takes 60 seconds or more to dry, so if you use them just bear that in mind and keep your fingers away from the ink. If you smudge any you can always use a tiny amount of nail varnish remover or alcohol to wipe it away with a cotton bud (don’t soak the cotton bud or the ink will run and leave to dry before adding any adhesive or more marker) **Only consider the nail varnish remover/alcohol as a last resort because it can make a real mess as I found out**. Im pretty sure all permanent markers or the three I tries anyway will run but as long as you are careful and seal the ink with the e6000 it will form a nice waterproof layer over the ink. If you have a fine tip pencil It may be worth you drawing the stars and stripes first with pencil and when you are happy going over the lines in pen.
Do you mean paint a layer of e6000 over the marker or it will go on as you place the crystals anyway?
Hi Danielle It will go on as you crystallize the shoe, you can just use the back of a jewel setter or orange stick to spread the glue out enough for a few crystals at a time.
Hi can I use isopropyl wipes or should I stick to the bottled solution?
Hi Louise That will be fine, just make sure that there are no fibers left behind from the wipe, if there are, you can just brush away with a cotton cloth once the toe is dry.
Hi thanks for the reply can I also ask is it recommended that you always colour the white area in the same colour as the crystals going on it as my other daughter wants purple crystals on hers thanks!
Hi Louise You don’t have to colour the area behind the crystals but it may leave white space depending on how tight the crystals are compacted together. If you are colouring the rubber make sure its a quick dry permanent marker and that you cover the i.nk completely with glue to seal the dye and stop it from running as permanent doesn’t stay 100% on converse rubber, but once they are sealed with e6000 they are fine. The other alternative is to use a fine colour glitter between the gaps
Sorry about this I just noticed the wipes are only 70% isopropyl is this ok or does it need to be 100%?
Hi Louise Most rubbing alcohols will be 70% isopropyl, so that’s fine as long as there are no moisturisers or oil in with the wipes.
I would like to know the name of the utensil used in picture number five. I blinged two pair of shoes so far. They both came out great. Thanks for the tutorial.
Hi Stephanie It’s a jewel setter, a plastic wand with wax bud tip which you can see here. https://www.crystalandglassbeads.com/721-jewel-setter-for-rhinestones.html
This tutorial was nice, but I wanted to do the outside of the converse with flatback pearls! Which glue would U suggest is better? I used gem-tac I believe on my two year olds shoe for trial and error before I tried to sell a couple & half of the pearls fell off after a day of running around!! Can u help?
Hi Nika
The Gemtac gives a pretty good bond but the e6000 is a lot stronger especially if its for kids where the shoes are going to take a bit of a knock. Which brand of pearls were you using and were they acrylic? Were they hotfix or non hotfix?