

What you will need:
1. Swarovski flatback Crystals NON-HOTFIX: Clear Crystal size ss12 (3.2mm), I also used a range of smaller sized crystals to fill in the gaps, Golden Shadow ss12 (2.6mm) and 3 x ss16(4mm) for the peaks of the tiara. The Converse Crystallized is an Infants size 8. View Swarovski Flatback Crystals
2. Magic Pick: This is a plastic wand with a sticky bud one side and pointed end the other, it makes picking up flatbacks very simple. View Magic Pick
3. Sand Paper / Emery board: You will either require a small piece of fine sandpaper or an emery board.
4. e6000 adhesive: This is an industrial strength craft adhesive that’s very strong, flexible, waterproof and clear in colour. It should be used in a well ventilated area with a mask for protection from the harmful fumes. View e6000 glue
5. Piece of cotton cloth / hanky: Cotton is ideal because it doesn’t leave fibres behind when you wipe a surface.
6. Orange stick: Small wooden stick used for pushing back cuticles.
7. Isopropyl alcohol (rubbing alcohol): Used for degreasing a surface by removing any traces of oil and grease and dries very quickly.
8. Converse boots / trainers / shoes: To add the crystals to.
9. Sharp Pencil: A Sharp Pencil or leaded Pen for drawing The Heart.
10. Ruler: Flat edge to mark out centre of the toe and Tiara start point.

Prep The Surface: Give the toe a gentle rub down with sandpaper or an emery board, to lightly scratch the surface. This gives the e6000 a better surface for bonding with.

De Grease and Remove any Dirt: Using some rubbing alcohol give the toe a rub down to remove any grease or dust caused by the sanding. If you don’t have rubbing alcohol you can use surgical spirit (Just don’t buy the one with castor oil ;))
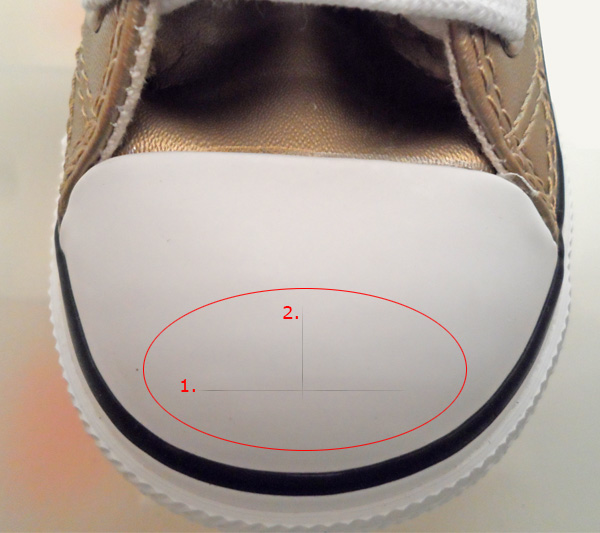
Mark Out Tiara Starting Point: Using a sharp pencil or fine leaded pencil mark out the starting point for the first row of tiara crystals line 1. Then draw a second line 2. down the middle of the toe (So that the tiara is centred).

Work Out Tiara Design: There are lots of different ways that you can make a tiara out of crystals, the design can be simple, complex or even just an outline.

Prepare The Crystals: Lay out your crystals on a clean flat surface with the faceted face up ready for use. For the heart in this Tutorial for a size 8 Infants Converse we used a variety of different size Golden Shadow, Swarovski Flatback Non Hotfix Crystals 2058 to crystallize the heart.

1st Row of Crystals: Using the back of the magic pick squeese a small amount of adhesive out of the tube and spread onto the area where the first row of crystals will be placed. Pick up a crystal with the magic pick tip and position onto the adhesive guide line to one side of the middle marker. Press the crystal down with the end of the magic pick or orange stick to secure the crystal into position, then place the second crystal the other side of the centre line………

2nd Row of Crystals: Start the 2nd row of crystals above the 1st row, positioned between the 2 centre crystals.

Continue Crystallizing Tiara: Row 3 of crystals complete make final adjustments and press crystals down into adhesive so that they are secure.

Finish Tiara: Add the 3 remaining larger crystals, ss16 (4mm) crystals have been used for this tutorial.

Crystallize Toe: Using the back of the magic pick or an orange stick add a smal amount of e6000 adhesive to the top corner of the Converse toe. Pick up an ss12 (3.2mm) crystal with the magic pick tip and position on the adhesive corner and then press the crystal down into the adhesive.

Complete Outer Row of Crystals: Continue adding crystals until you reach the end of the row if the ss12 crystal doesn’t fit use a smaller size crystal to finish the row.
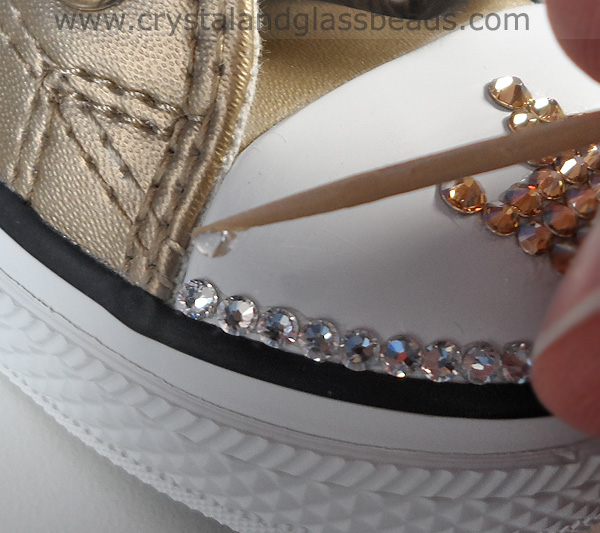
Top Row of Crystals: Add some adhesive using the orange stick or pick along the top edge of the toe. Continue adding crystals until the top edge has been completely Crystallized, if you are lucky you will be able to complete the row using ss12 crystals, if not use a smaller crystal (ss9) to finish off the row.

2nd Row of ss12 Crystals: Starting from the top left or right corner start a second row of crystals inside the outer row adding a few crystals at a time. If you apply too much adhesive at one time then the glue will likely have hardened before you get to the end, so enough glue for a few crystals at a time is good.

Fill in the Gap: You will need a variety of sized crystals to fill in the gap below the tiara. You will get a tighter fit by placing the crystals into the gap without using any adhesive once you have decided on the best fit remove the crystals, (keeping note of their position) glue the area and then add the crystals.

Fill in the Gap Tiara Side: From now on its trial and error for working out the best fit with the least gaps. Try positioning crystals in the gap without using any adhesive again once you have decided on the best fit remove the crystals, (keeping note of their position) glue the area and then add the crystals.
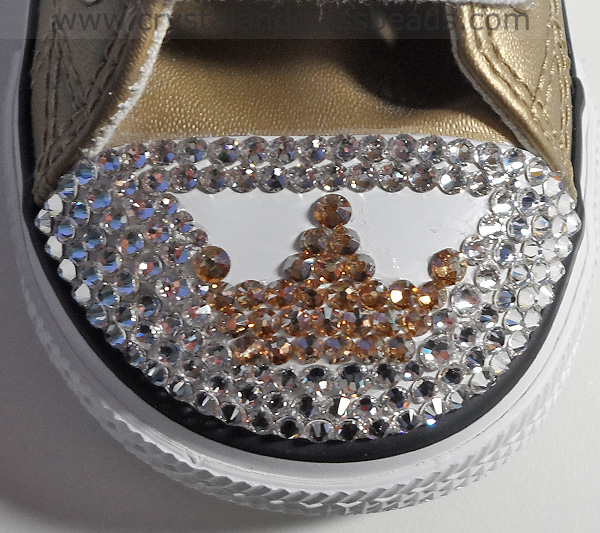
Fill in the Gap: On the Opposite Side Continue along the same principle of working out the best crystals and then gluing them into place working row by row to fill in the gap.

Completed Converse Toe: Closeup of the finished Crystallized Converse toe with Tiara.

You can view the tutorial in more stages on our Youtube Channel.
If you find this tutorial useful please give us a like or share with others as these tutorials take a long time to put together and getting people to see them or getting feedback makes creating them worth while. Many Thanks.


Hi what size crystals would I use to put writing on the side of converse? Which would be best hank you
Hi Stace
ss12 or ss16 are a good size to go on the side of converse it really depends on how small or big you want them and what size converse they are for for a child’s you can go down to ss9 but any smaller and they become more difficult to apply without getting glue on the crystals and for an adults up to ss20 although I think using ss12-ss16 looks nice and is easy to work with. You can find a printable pdf for the crystal sizes here https://www.crystalandglassbeads.com/rhinestone-sizes.pdf
Hi
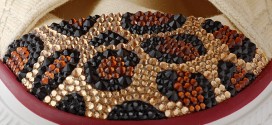
Do you have a tutorial for creating a leopard print on the toe of a pair of converse? I want to try and create a pair for my niece in pinks and purples to match the converse so any help would be appreciated
Thanks
Hi Leanne
I have a pair of converse which I am going to do a leopard print tutorial on : )
Hello I’m preparing to add a crown to an adult size 8 shoe and was wondering if you could estimate how many rows to use and what size crystals would you recommend? I did view the crown tutorial that is very helpful! Thanks in advance 🙂
Hi Sheila if you have a look at the crown tutorial it will show a number of different crown designs which are larger than the one we used alternatively you van use larger crystals if you want the same shaped crown but just a bigger version.
Hi
Have I missed the leopard print tutorial? I really wanna so them as soon as possible and need your expertise
Thanks
Hi Leanne
Am doing a zebra print one today and will try and get the leopard print one done soon also.
Hi Jasmine
Will do.
Hi would you say it’s best to use ss12 on children’s and then go to a ss16 when you get to adult sizes??
Hi Kelly
Yes I would opt for ss16 on adults and ss12 on children’s converse. You can use ss12 also on adults (And it will look sparklier as you are using more crystals) if you are working on a budget and only buying one size bulk pack but generally it’s more cost effective to use the ss16 as you use less crystals and they look nice on an adults shoe. Hope that helps.
Where can one fine these shoes at a wholesale price
You would need to contact Converse and ask them to provide you with a list of wholesalers if they have any or enquire as to the criteria to become a wholesaler directly through them.